Sugar Glue: The Easiest Way To Construct A Gingerbread House
Move over royal icing.
If you’ve ever tried to build a gingerbread house with royal icing, you already know the struggle. You pipe, you hold, you pray, and then you watch one wall slooowly slide out of place like a sugary Jenga tower. Royal icing can work - but if you want something fast, strong, and frustration-free? Nothing beats hot sugar glue.

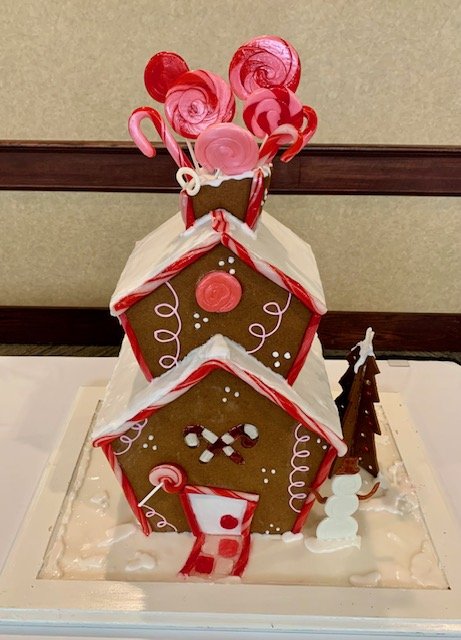
I’ve used hot sugar for years to construct gingerbread houses, and it’s my secret weapon. In fact, when I won a gingerbread house competition, my entire structure was built using nothing but cooked sugar. No icing mortar, no waiting for things to dry, no collapsing roofs. Just pure candy construction.
Let’s get into why sugar glue is a total game changer - and how you can make your own.
1. It sets instantly
Hot sugar cools and hardens within seconds. No propping, no holding corners together while whispering holiday prayers. Touch gingerbread to sugar, hold for 2–3 seconds, and boom - solid.
2. It’s incredibly strong
Once cooled, sugar glue is basically edible cement. Your walls will stay put. Your roof will not slide. Even tall, whimsical pieces stay secure.
3. It's easier than making royal icing
Royal icing can be finicky—too thick, too thin, clogged piping bags, needing long dry times. Sugar glue? Just melt sugar, dip, and stick.
4. It gives you precision
You can join pieces at funky angles, add decorative attachments, and build finer details that icing just can’t hold quickly enough.
Safety First (but don’t be scared!)
Sugar glue is hot, so treat it like you would a glue gun.
A few tips:
Set up your workspace before cooking. Set out a silicone mat next to where you are building your house. This silicone mat will be the place you will work with your hot sugar and catch any spills.
Keep kids clear during assembly.
Use gloves if you are nervous - I use vinyl dishwashing gloves when I’m pulling sugar, but in this method, you shouldn't come into contact too often with the sugar.
Work quickly, but calmly - melted sugar waits for no one.
Once your structure is built, it’s totally safe to touch and display.
Assembly Tips for Best Results
Build in stages
Start with the four walls, then add the roof. With hot sugar, each joint is solid immediately, so you can move fast.
Keep the pot of sugar warm
Place it on low heat or keep it on a warm burner so it doesn’t harden in the pot.
Use a silicone mat
Sugar won’t stick to it, so use this mat to be your work space, the place where you dip the sugar and construct.
Don’t worry about “messy” joints
You’ll likely get a few caramel drips. They actually look charming and toasty - like your gingerbread house was baked together.
What are you waiting for? Give it a try for your next project.
The recipe
Sugar Glue
Ingredients
2 cups granulated sugar
1 Tbsp lemon juice or vinegar
1/4 cup water
Directions
Add sugar, lemon juice/vinegar and water to a small heavy bottomed saucepan.
Heat over low/medium, stirring until the sugar melts. You’ll know it’s melted when you can’t feel sugar granules on the bottom of the pan, and there may be a cloudiness on the top of the mixture.
Stop stirring and turn the heat up to high, insert a candy thermometer if you are using one, and let it cook until 300F. If you are not using a thermometer, let it boil until it turns a light amber color, about 5-7 minutes.
Remove from heat - the sugar will thicken slightly as it cools.
I like to avoid dipping my gingerbread directly into the pot, because food particles in your sugar may lead to crystallization. Instead, I take a silicone mat and pour a little bit of the sugar out onto the mat, and dip the edges in this. Put the pot back onto a warm surface, like the element you just turned off to keep it ready. Work quickly, the sugar will harden fast on the mat! Alternatively, you can spoon the sugar onto the places you need to. If you find the sugar starts cooling too much in the pot, rewarm it on the stove.
Press pieces together for a few seconds until the sugar hardens, about 30 seconds.


Hey, I’m Kim!
After a lot of practice (and a few sticky disasters), I’ve crafted a delicious selection of lollies and mastered a ton of candy making tips to share with you—lump free. (You’re welcome.)